This article explains how to reconstruct a plant's three-dimensional form from a video shot on a smartphone, at true real-world scale, and preserve it as data. It also explains how to obtain plant height, surface area, and volume from the reconstructed 3D data.
I believe that keeping a plant's form as three-dimensional data has a value that recording numbers alone cannot offer. To measure is to summarize a plant's form into a few numbers. Put another way, it is to reduce information. If you save the three-dimensional data, none of the original information is lost. You can measure different traits later, and you can observe the plant again just as it was that day.
All you need is a smartphone, LumaAI, a cloud service that reconstructs 3D from video, and Meshmixer, a free program for editing 3D data.
What you need (all free)
- A smartphone — to film two slow laps around the plant
- A LumaAI account — sign up at lumalabs.ai/dashboard/captures. It builds a 3D model from your video automatically
- Meshmixer — download from meshmixer.com. A free 3D program from Autodesk, used to edit and measure the model
The whole workflow is done with the plant growing in a pot, so the first step is simply to get your plant ready.
When you collect the plant, dig it up gently so you do not damage it. Lifting it out together with the roots and the surrounding soil keeps the impact on later growth to a minimum.
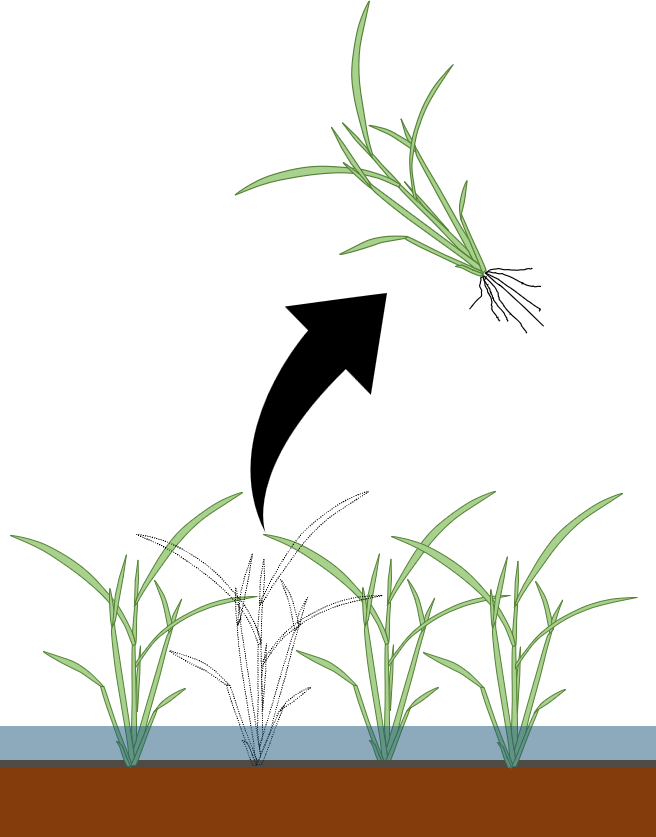
Transplant the plant into a pot. Since the pot becomes your reference for filming and measurement, plant it so it stands upright.
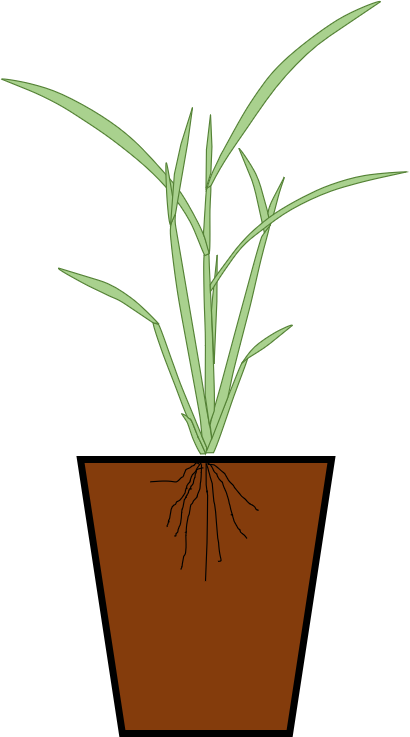
* Rice illustrations by Prof. Keisuke Katsura (Kyoto University)
The pot's diameter, or the length of its side, can serve later as your real-world scale reference. Choosing a pot whose size you know makes the following steps easier.
Circle the plant twice with your smartphone while filming, and build the 3D model from that single video. How cleanly the model turns out depends a great deal on how you film. As in the clip below, circle the plant slowly and at a steady pace.
A few points for filming well:
- Film in a bright, wind-free environment. Indoors or under a tarp tent works well. Choose a spot that is bright enough, where the brightness stays steady, and where there is no wind. If the leaves move or the lighting shifts, the shape will not settle and the model breaks down.
- Keep the whole plant and pot in frame. Too close and the rotation is hard to track; too far and the resolution drops. Stay at a distance where everything fits on screen.
- Include something of a known size. Putting something whose dimensions you know in the shot, such as the pot's diameter, a cube-shaped box, or a ruler, lets you set the real scale correctly later.
- Make the background deliberately busy. A background scattered with objects of different shapes and colors helps the software recognize how far you have rotated. Avoid a plain, empty background.
- Film at the highest resolution and frame rate you can. The higher the resolution and FPS (frames per second), the smoother and more detailed the model.
- Hold steady and circle slowly. Hold the phone with both hands and go around at an even pace. Sudden movements cause blur.
- Go around twice, at different heights. Make the first lap looking down at an angle, then continue straight into the second lap from about eye level. Filming from different angles captures the whole plant, and the smooth, continuous motion makes the rotation easier to track.
Capture the angled-down lap and the side-on lap in a single video, with no break between them. Once filmed, upload it to LumaAI in the next step.
Upload your video to LumaAI Capture, and it reconstructs a full 3D model from the footage automatically. As shown below, a complete, all-around model rises straight out of the video.
Open lumalabs.ai/dashboard/captures and upload your video from "Create." There is no limit on how many times you can use it, and you can process up to three at once. The first time, you will need to sign in with your email address.
Luma AI publishes an iPhone app called Luma 3D Capture. You can upload a video you have already shot directly from the app, or build the 3D model while filming with the app's camera. This saves you from moving files to a computer, so it helps when you want to shoot and check on one device. Models are saved to the same account as the web version, so you can continue the work on your computer. The app is for iPhone only — there is no iPad version.
On its official plugin page and in its official web rendering library on GitHub, LumaAI shows that it uses two AI representations: NeRF (Neural Radiance Fields) and 3D Gaussian Splatting. NeRF trains a neural network to learn the color and density of space; 3D Gaussian Splatting represents the scene as countless small blurred ellipsoids, and its light-weight rendering has made it the current mainstream. The original papers for both methods are openly available: NeRF (Mildenhall et al., 2020) and 3D Gaussian Splatting (Kerbl et al., 2023).
The details of the pipeline are not public, but since these methods need to know where each frame was taken from, a camera-pose estimation step (akin to SfM, Structure from Motion, in photogrammetry) presumably runs beforehand. The OBJ file you download comes from a step the former official API called "meshing" — the surface is extracted from these representations and converted into a polygon mesh (the specific algorithm is not disclosed). It is because the data becomes a mesh that Meshmixer can measure volume and surface area.
Once the model is ready, check in the viewer that the plant is cleanly separated from the background. Rotate the view and make sure nothing unwanted has crept in.
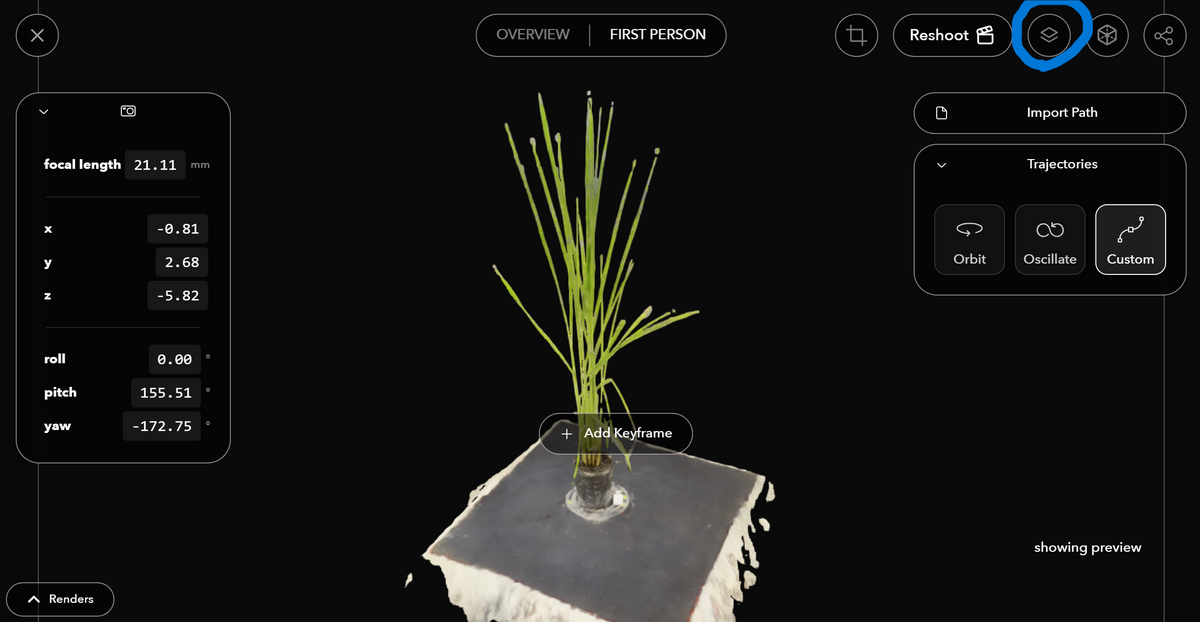
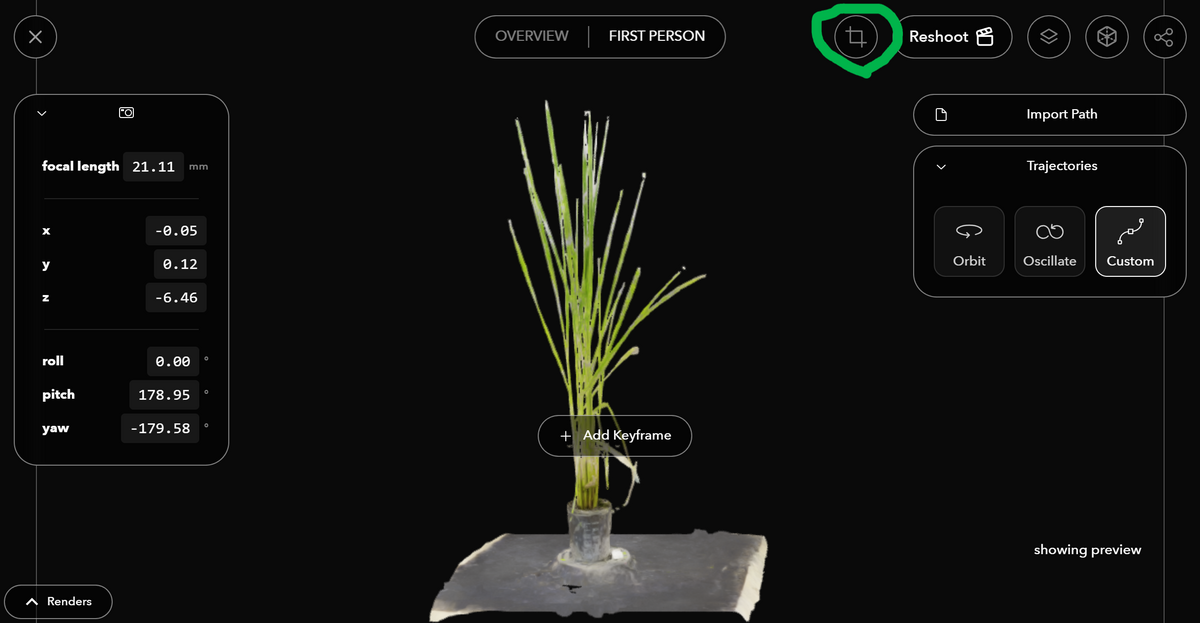
Reconstruction does not always succeed — the background may not separate cleanly, or the plant may come out broken. In that case, trimming the video to just one of the two loops and uploading it again often helps. If that still fails, re-film the video.
If some background is still included, use the bounding box to keep only the area you need.
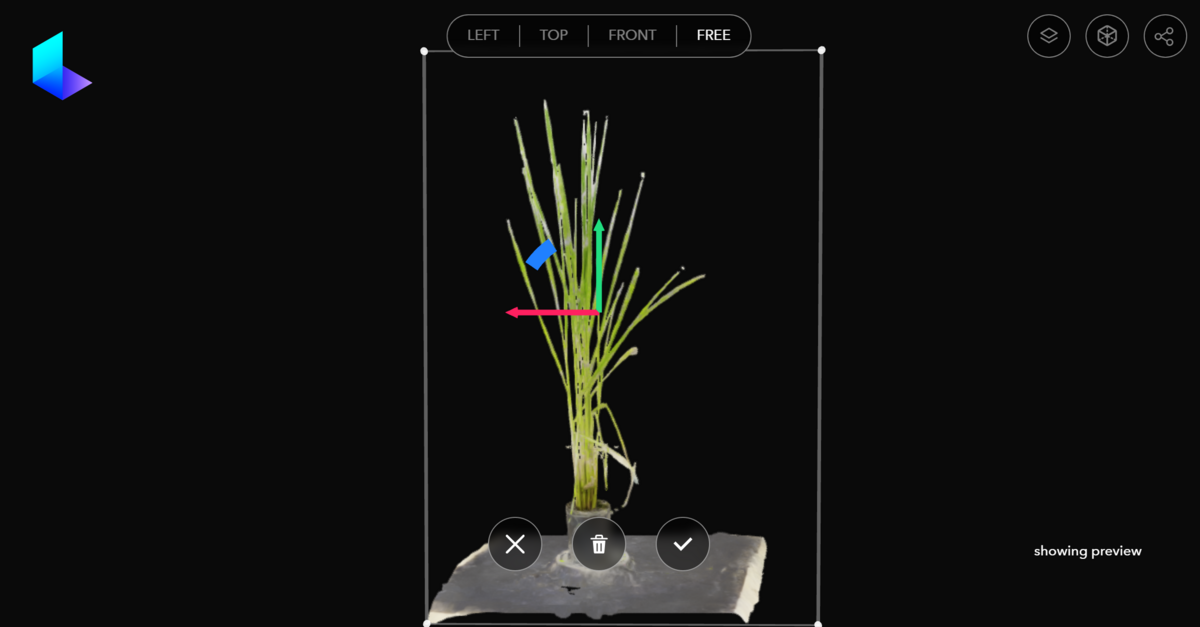
When it looks right, download the model. For the export format, choose OBJ, and pick high poly to keep as much of the shape as possible. High-poly files are large, though, and the later steps can feel slow on some PCs. If that happens, try medium poly or low poly as well, and find a balance between detail and workability.
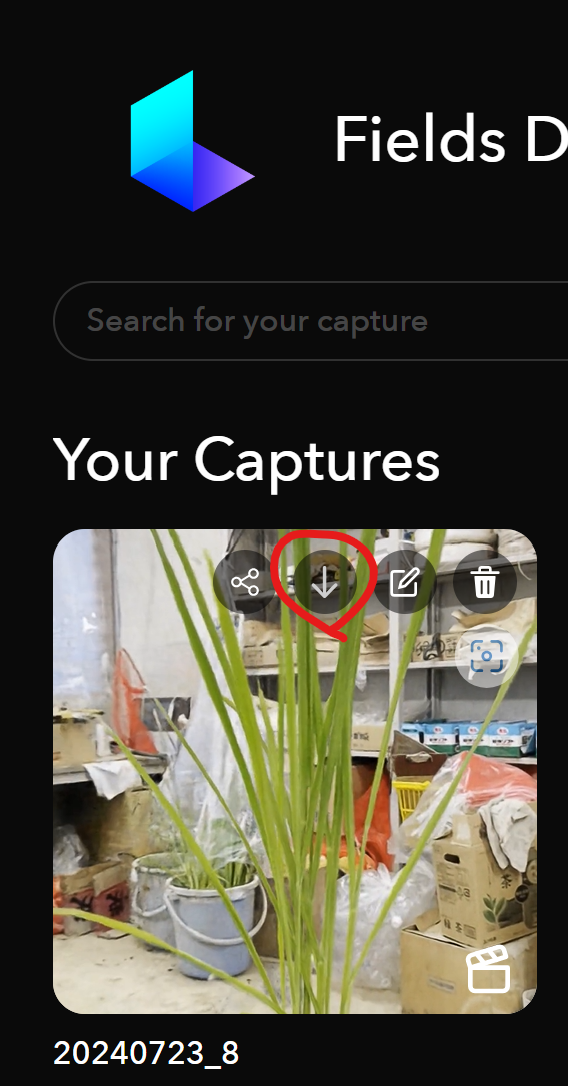
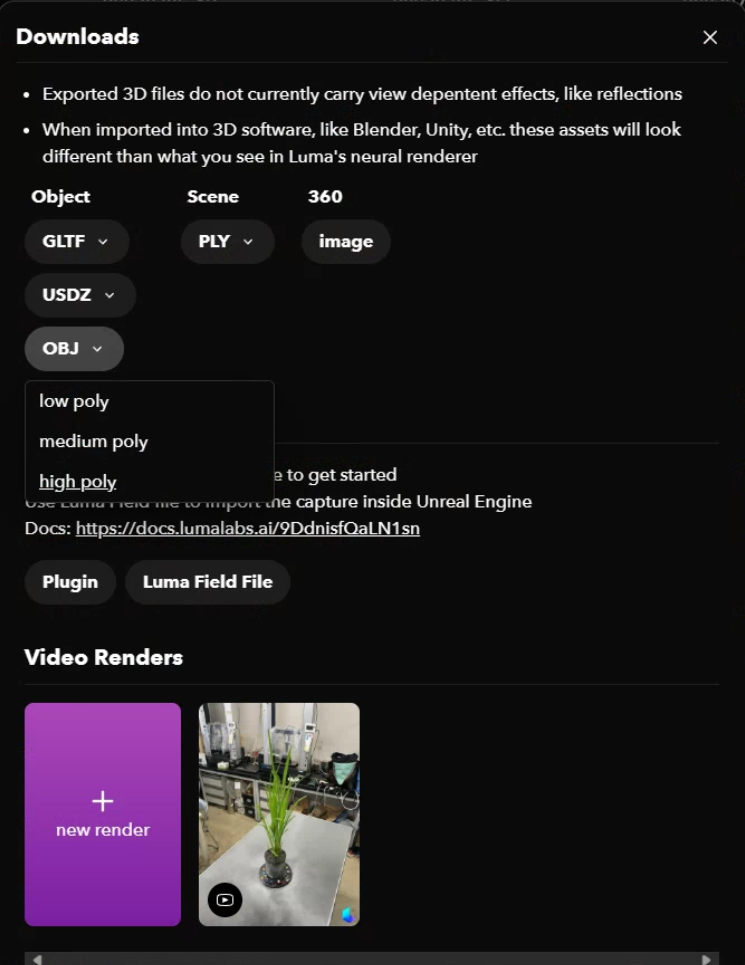
The download comes as a ZIP archive. Unzip it before use (on Windows: right-click → "Extract All"). Make sure the extracted folder name and its path contain no Japanese or other non-ASCII characters — if they do, the model opens in Meshmixer without its colors. A safe choice is an alphanumeric folder in a shallow location such as C:\lumaai.
Launch Meshmixer, click "Import," and select the OBJ file inside the unzipped folder.
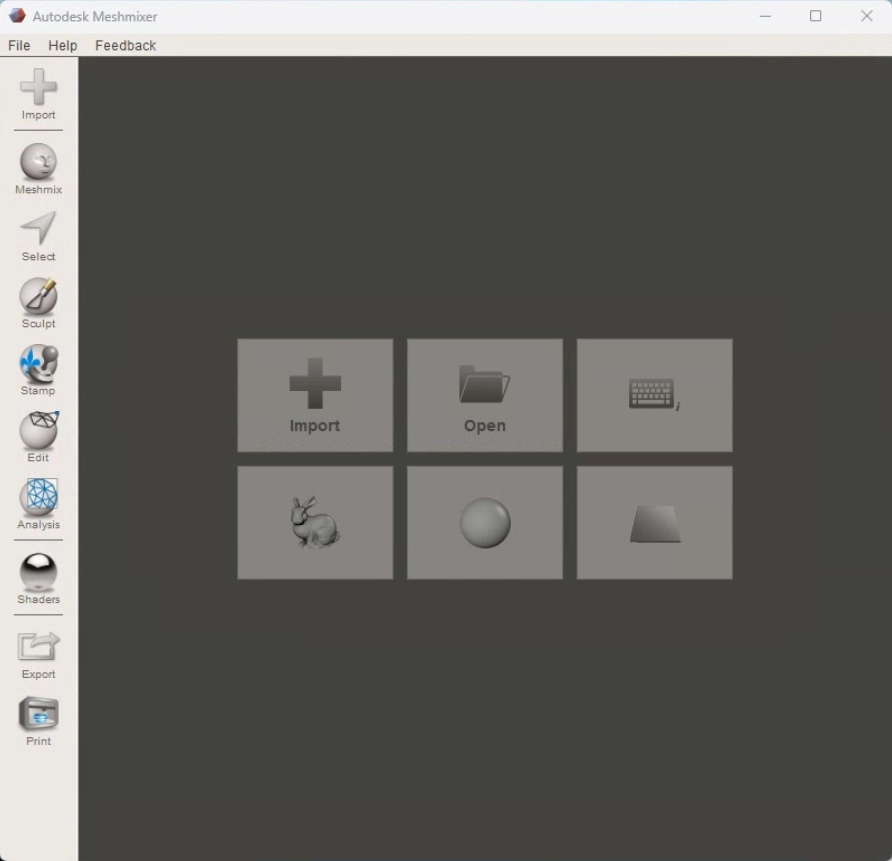
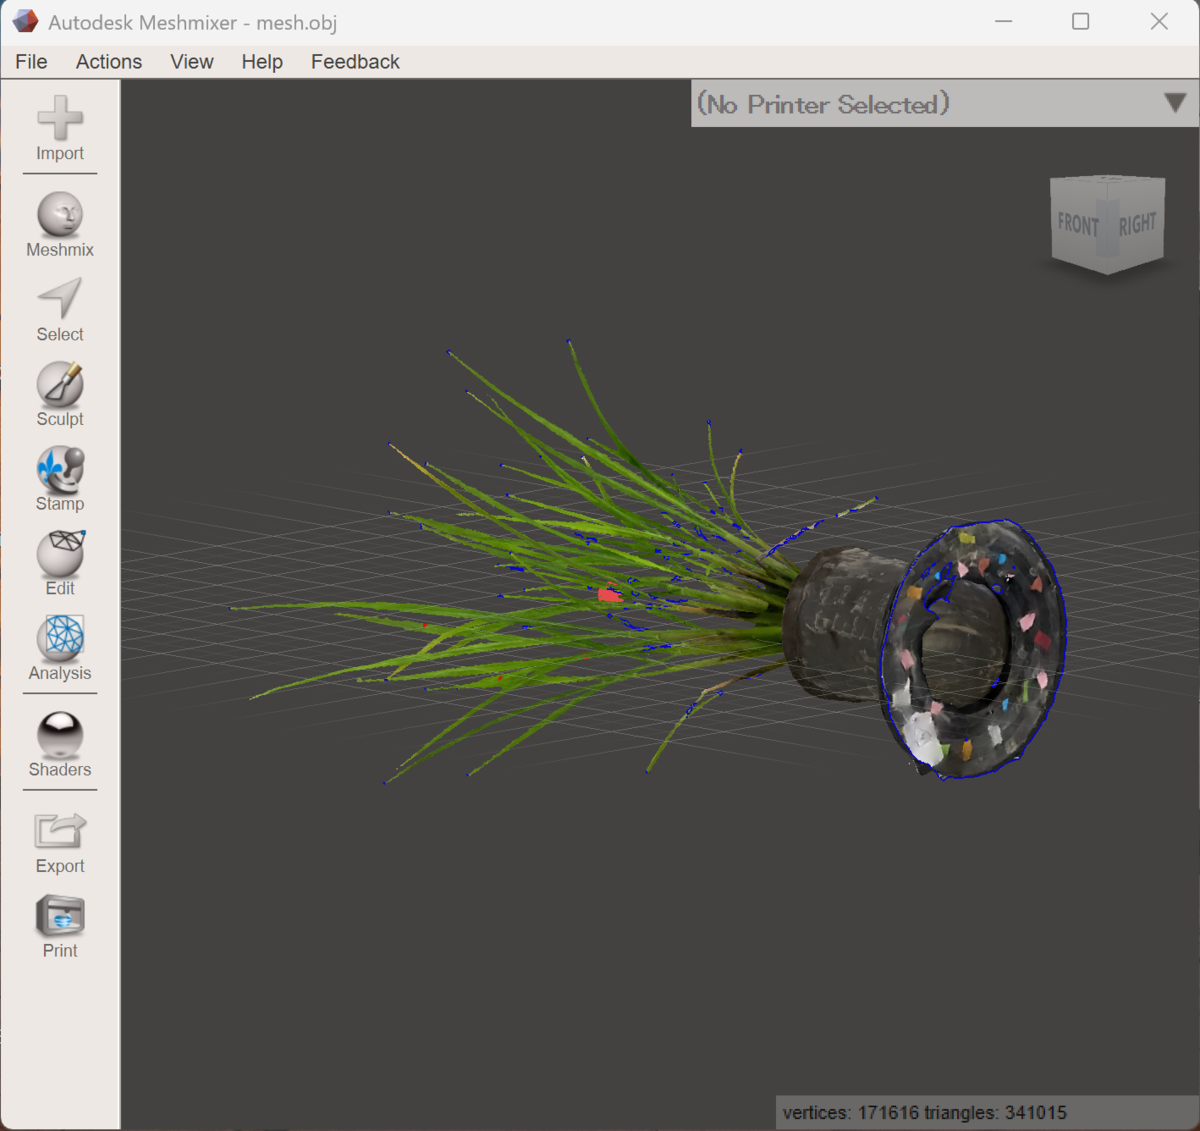
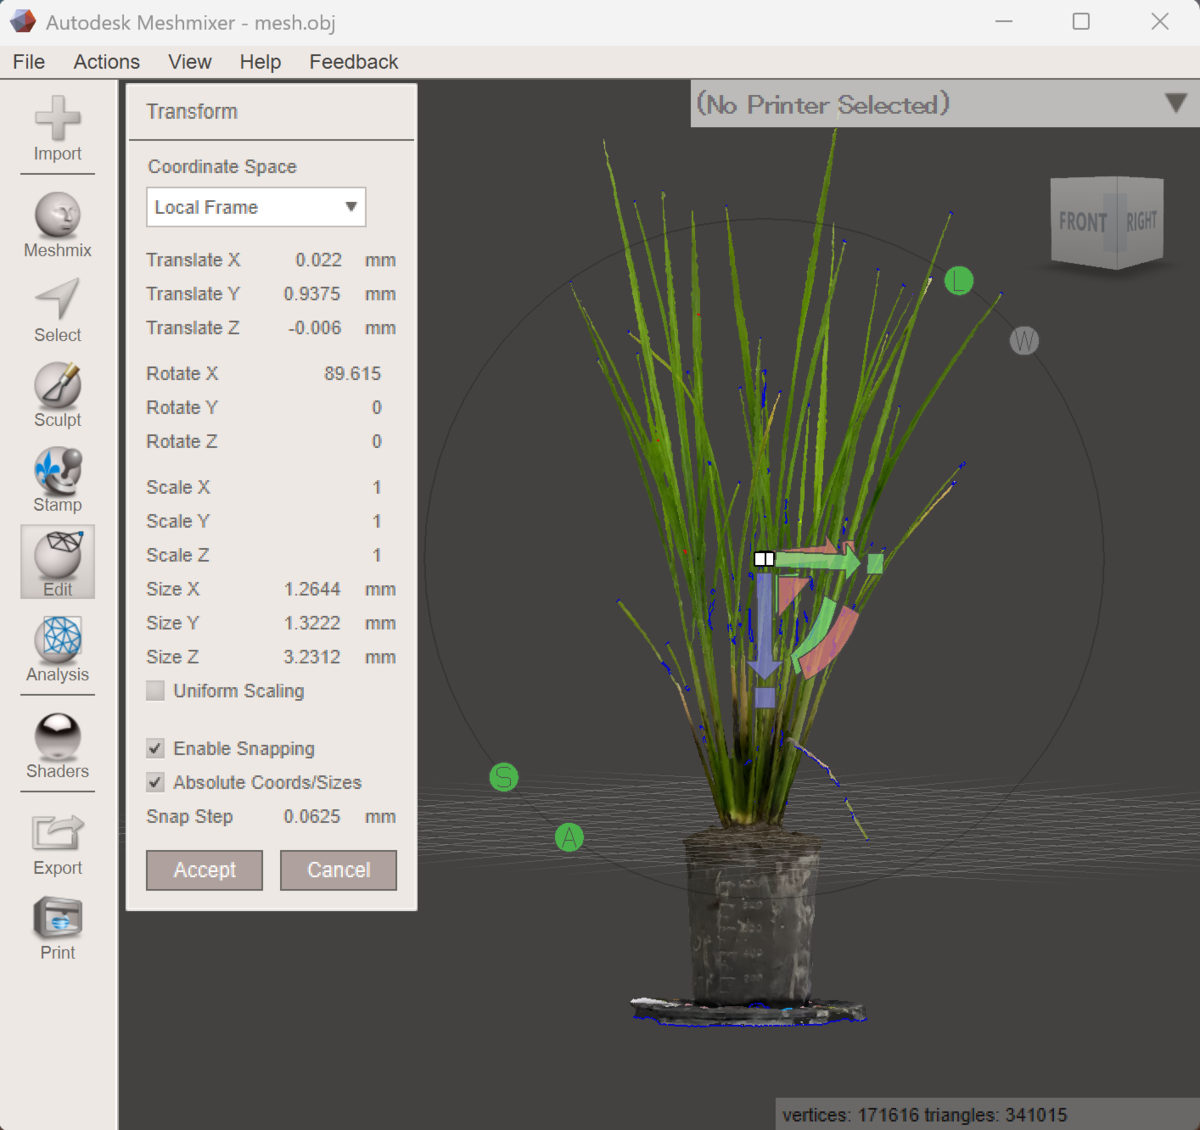
Right after import, the model is often tilted or sitting on a slanted floor. Open "Edit → Transform" and handles appear on the model. Drag the arrows to move it and the arcs to rotate it, until the plant stands upright.
You can also adjust the position and rotation with "Edit → Align." Pick a surface or point as the reference, and the whole model snaps straight to match it — for setting the base flat on the floor, this is often quicker than rotating by hand with Transform.
Drag with the right mouse button to rotate the view, and drag while pressing the scroll wheel to pan.
On a laptop without a mouse, hold Alt and drag with the left button held down to rotate, or hold Alt + Shift and drag the same way to pan. Dragging with the right button held down also rotates the view. A two-finger swipe zooms in and out.
These move your viewpoint rather than the model, so use them alongside Transform.
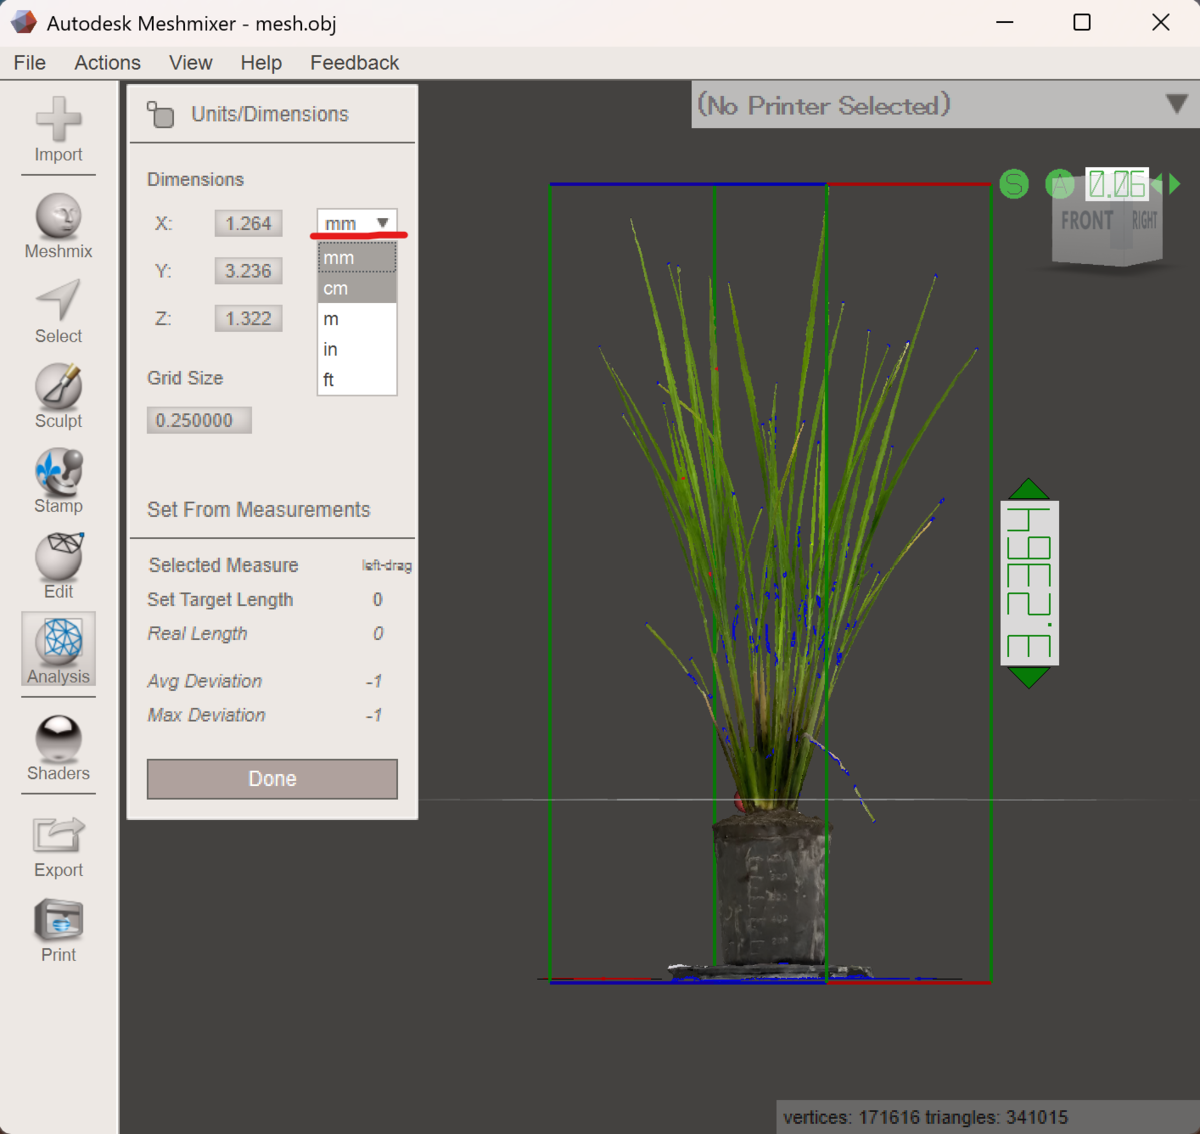
By itself, a 3D model has no unit of length. Open "Analysis → Units/Dimensions" and choose your unit (cm, for example). Then left-drag on a part whose length you know to draw a reference line, and enter its real size in the "Set Target Length" field. The whole model is scaled to match.
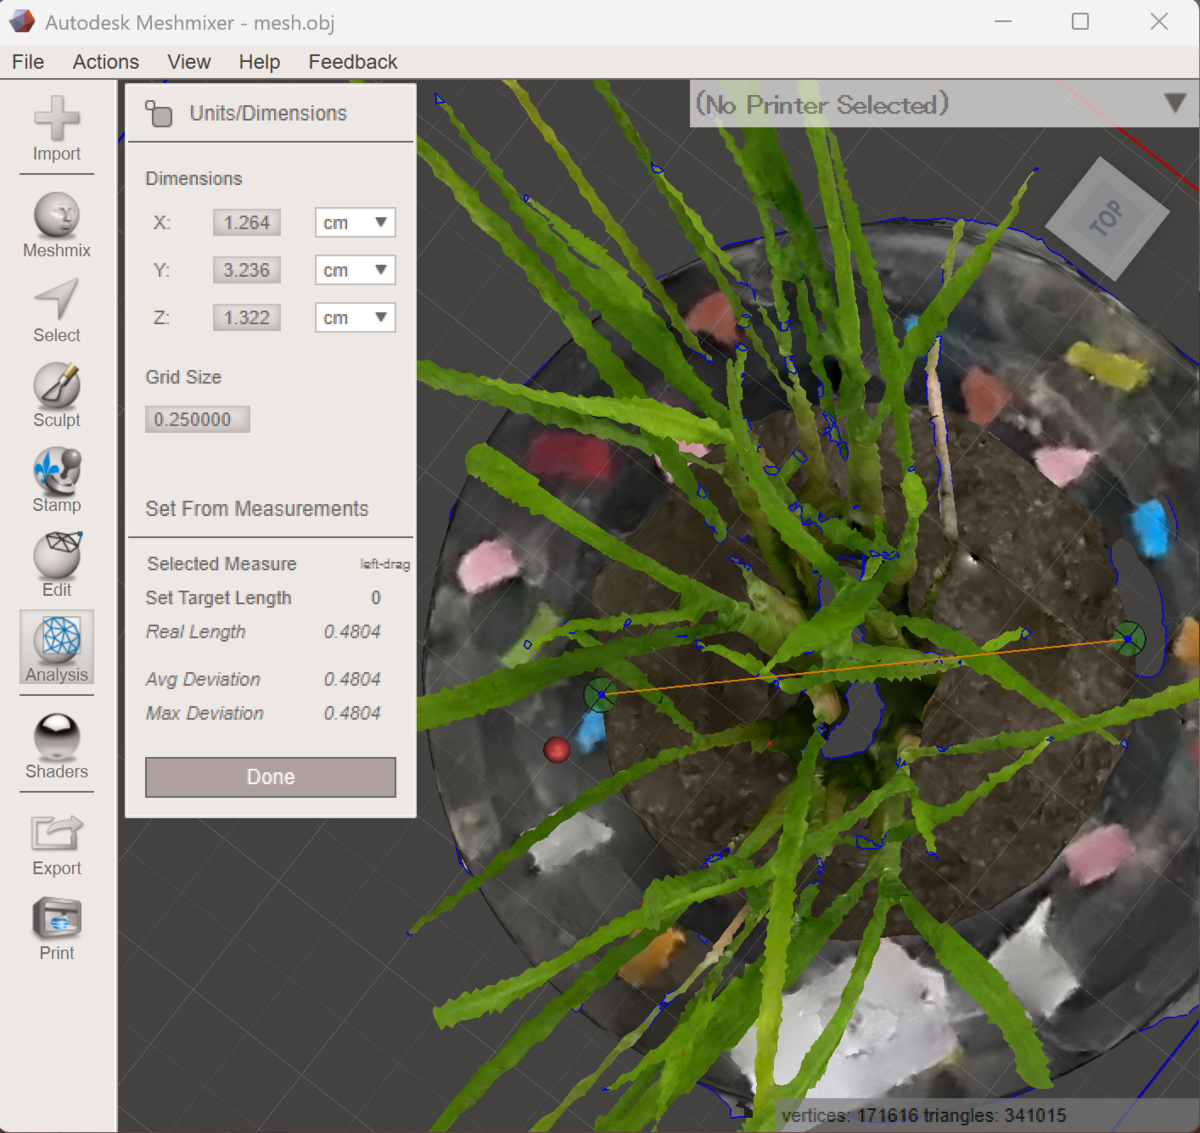
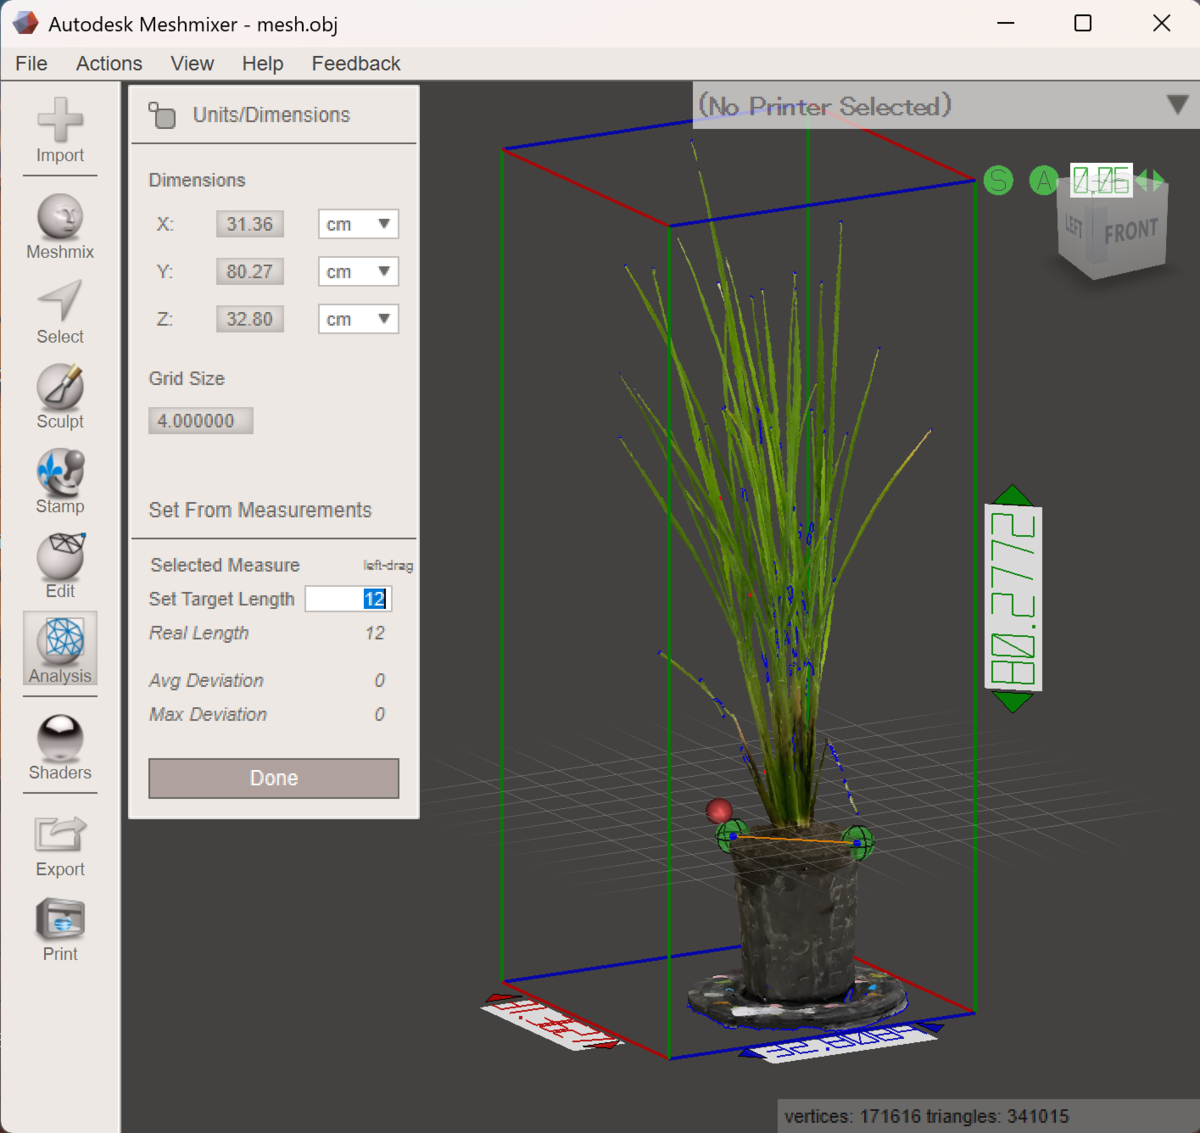
This step decides the accuracy. The reliability of your volume and surface area comes down to this calibration. It helps to place something of a clearly known length in the shot when you film, such as the pot's diameter, a cube-shaped box, or a ruler.
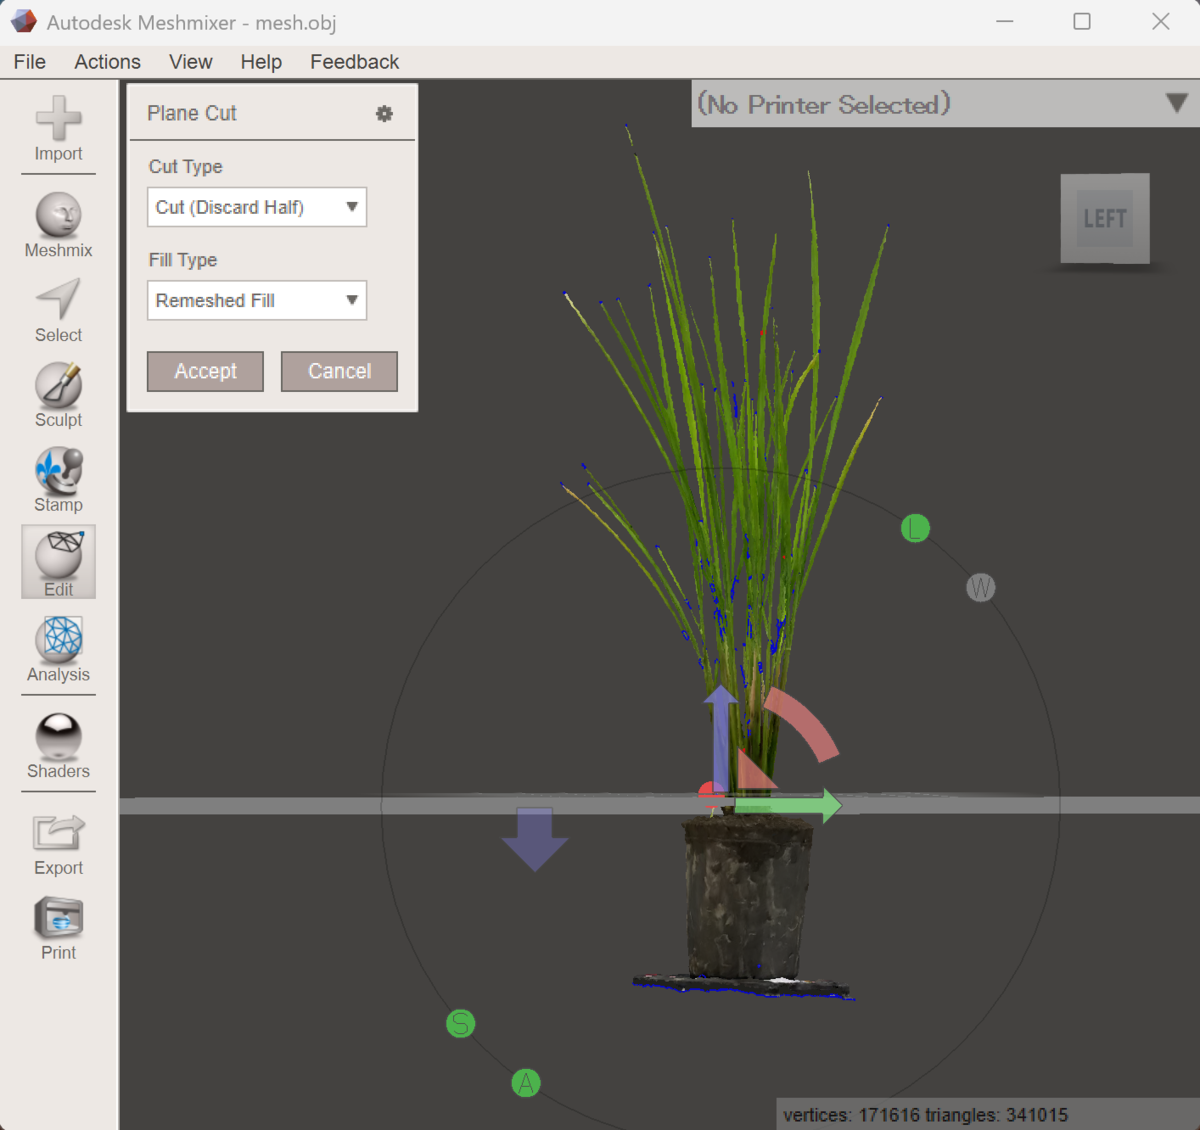
Remove parts you do not want to measure, such as the pot and the ground. Open "Edit → Plane Cut" and rotate and move the cutting plane into position. Set "Cut Type" to "Cut (Discard Half)" and "Fill Type" to "Remeshed Fill," then click "Accept" to slice everything below the plane away in one go.
With "Remeshed Fill" selected, the cut cross-section is automatically closed with a new surface. An open cross-section would make the volume come out wrong, so after cutting, look at the bottom of the model and confirm it is sealed without holes.
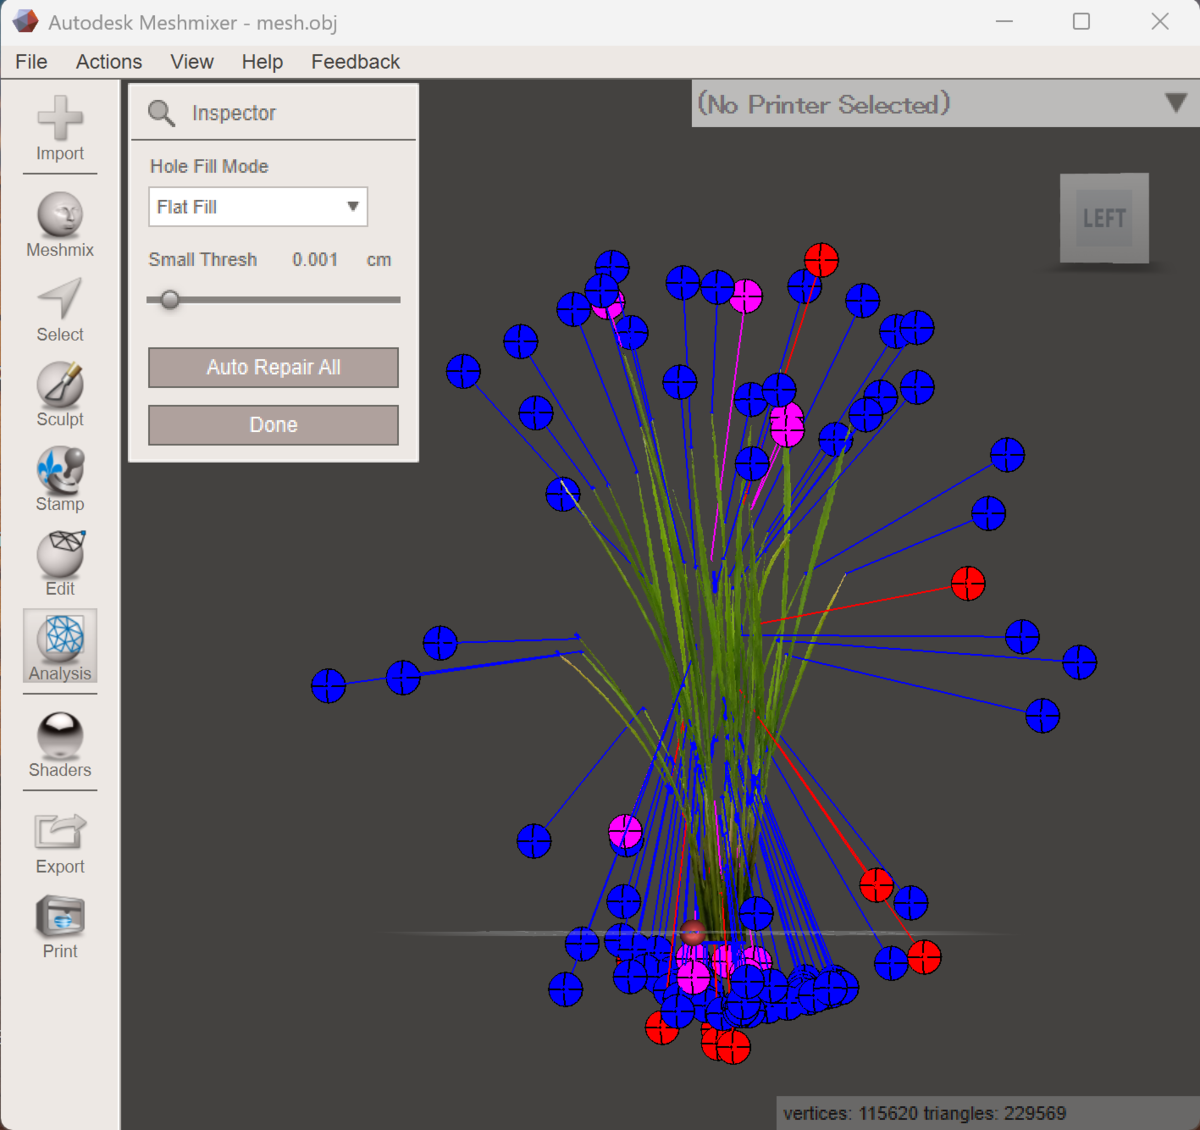
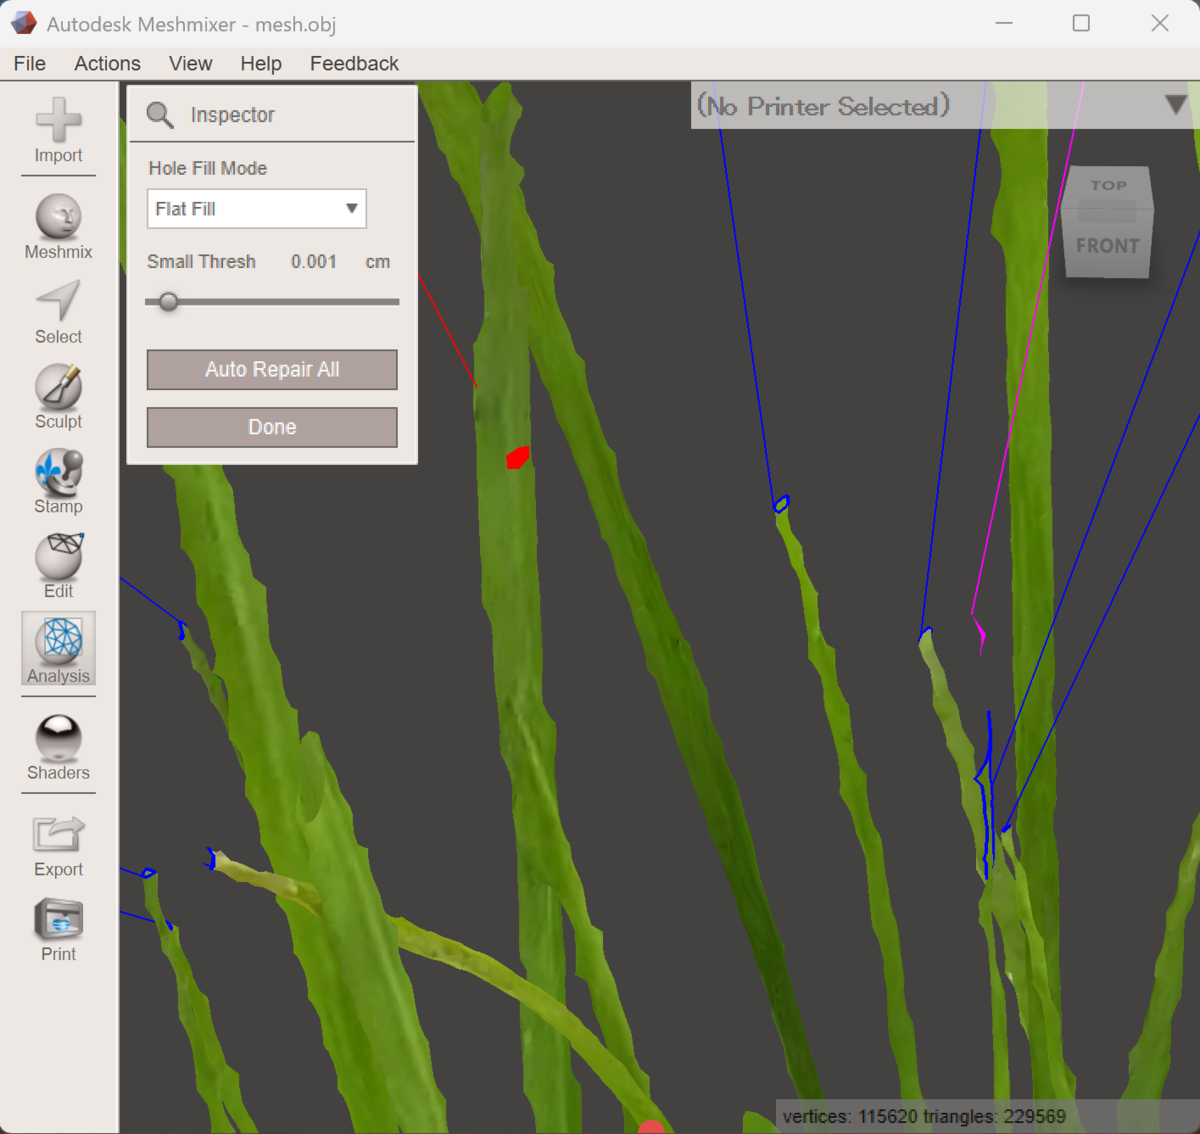
A model built from video can be left with small holes or stray floating fragments. Open "Analysis → Inspector" and markers appear on the problem spots. Blue means a hole, pink a tiny fragment, and red an invalid shape. Set "Hole Fill Mode" to "Flat Fill," adjust the size of noise to remove with "Small Thresh," and click "Auto Repair All" to fix everything at once. When all the markers are gone, the model is ready to measure.
Now that the model is scaled and contains only the plant, save this version as its own file. First, create a new folder with an alphanumeric name to save into (for example, C:\lumaai\rice01) — if the folder name or its path contains Japanese or other non-ASCII characters, the model will open without its colors later.
Once the folder is ready, open "File → Export," choose OBJ as the format, and save into that folder under an alphanumeric name. Alongside the original download, you now keep the data exactly as it was measured.
As noted at the top of this page, keeping the 3D data means you can measure new traits later, or observe the plant again as it was. Adding the date and a plant ID to the file name makes it easier to find afterwards.
The export writes not just the .obj but also a .mtl file and texture images. The color lives in these companion files, so keep all of them together in one folder — moving the .obj alone gives you a colorless model. Note that areas filled during repair carry no color, but this does not affect the measurements.
Before measuring, check the model's height. Open "Analysis → Units/Dimensions" to see the model's dimensions (X, Y, Z), and look at the vertical (Y) value. If it is close to the real plant, the scale was set correctly. A value far from reality is a sign to go back and check.
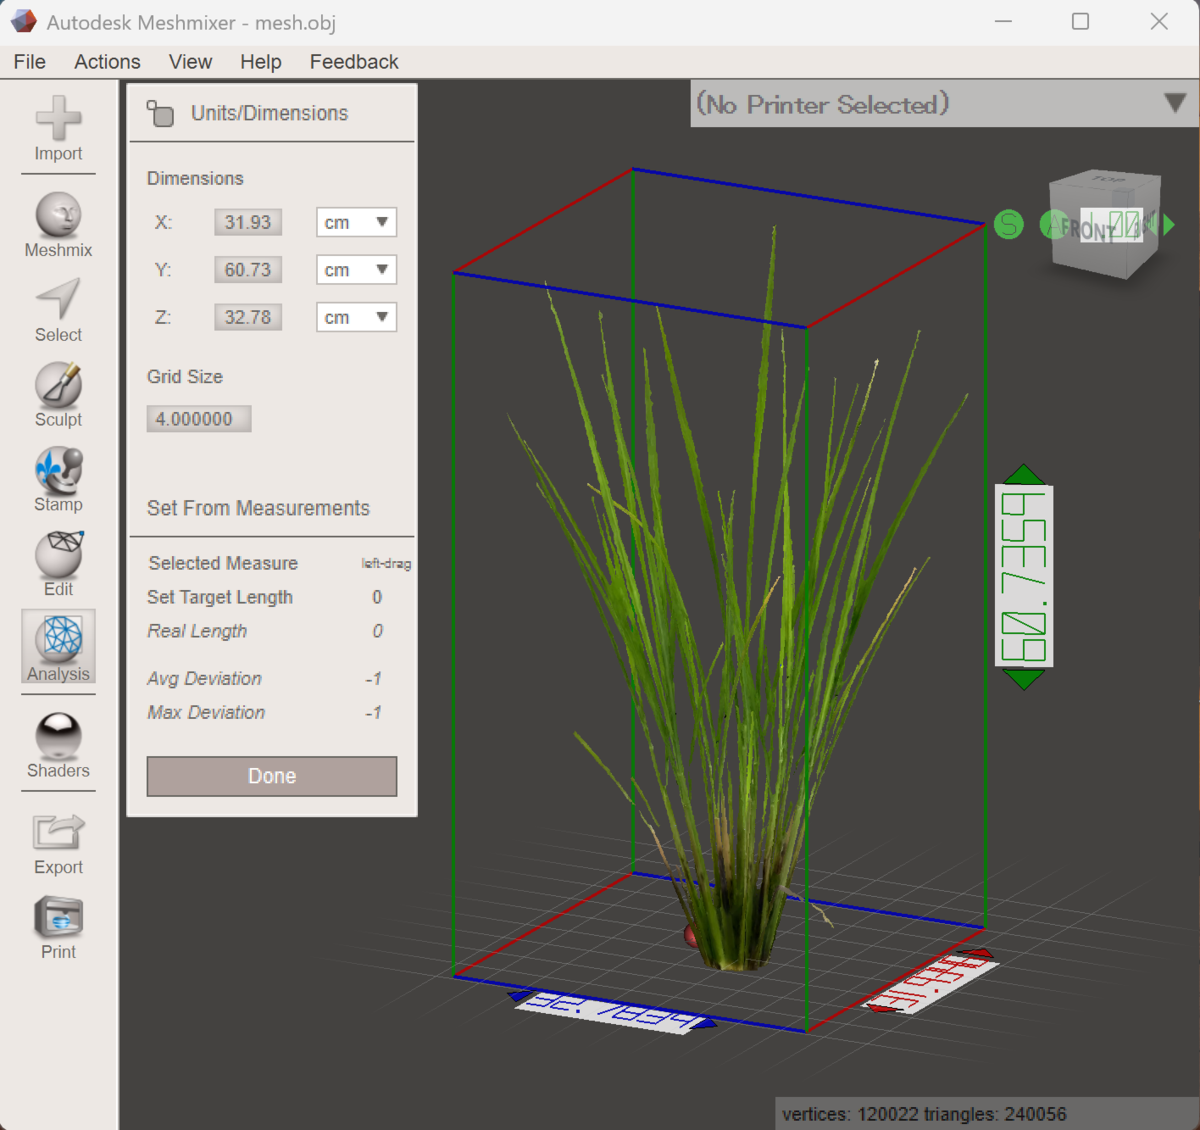
Sometimes, even after the pot has been deleted, the dimension box still encloses the region where the pot used to be, and the Y value comes out larger than the real plant height. In that case, left-drag to draw a straight line on the plant itself, just as you did when setting the scale. The "Real length" field shows the actual length of that line, so you can read the height directly.
From the finished model, read off the measurements. Open "Analysis → Stability" and the "Volume" and "Surface Area" values appear. Take a moment to check whether the numbers fall in a realistic range.
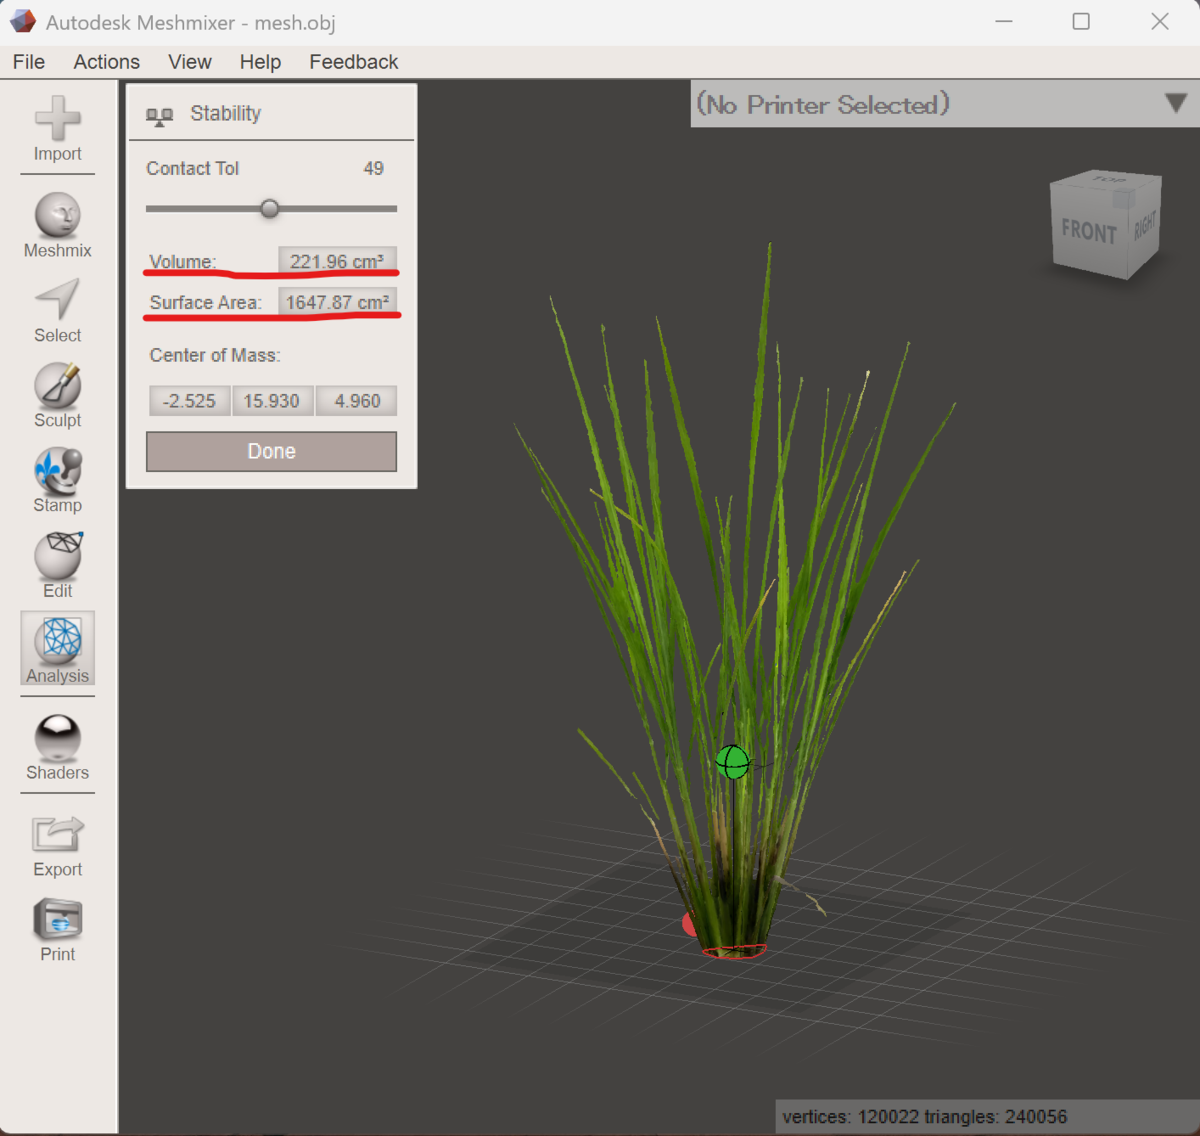
If a value comes out far too large or too small, the scale setting or the repair may have something you missed. Go back a step and check.
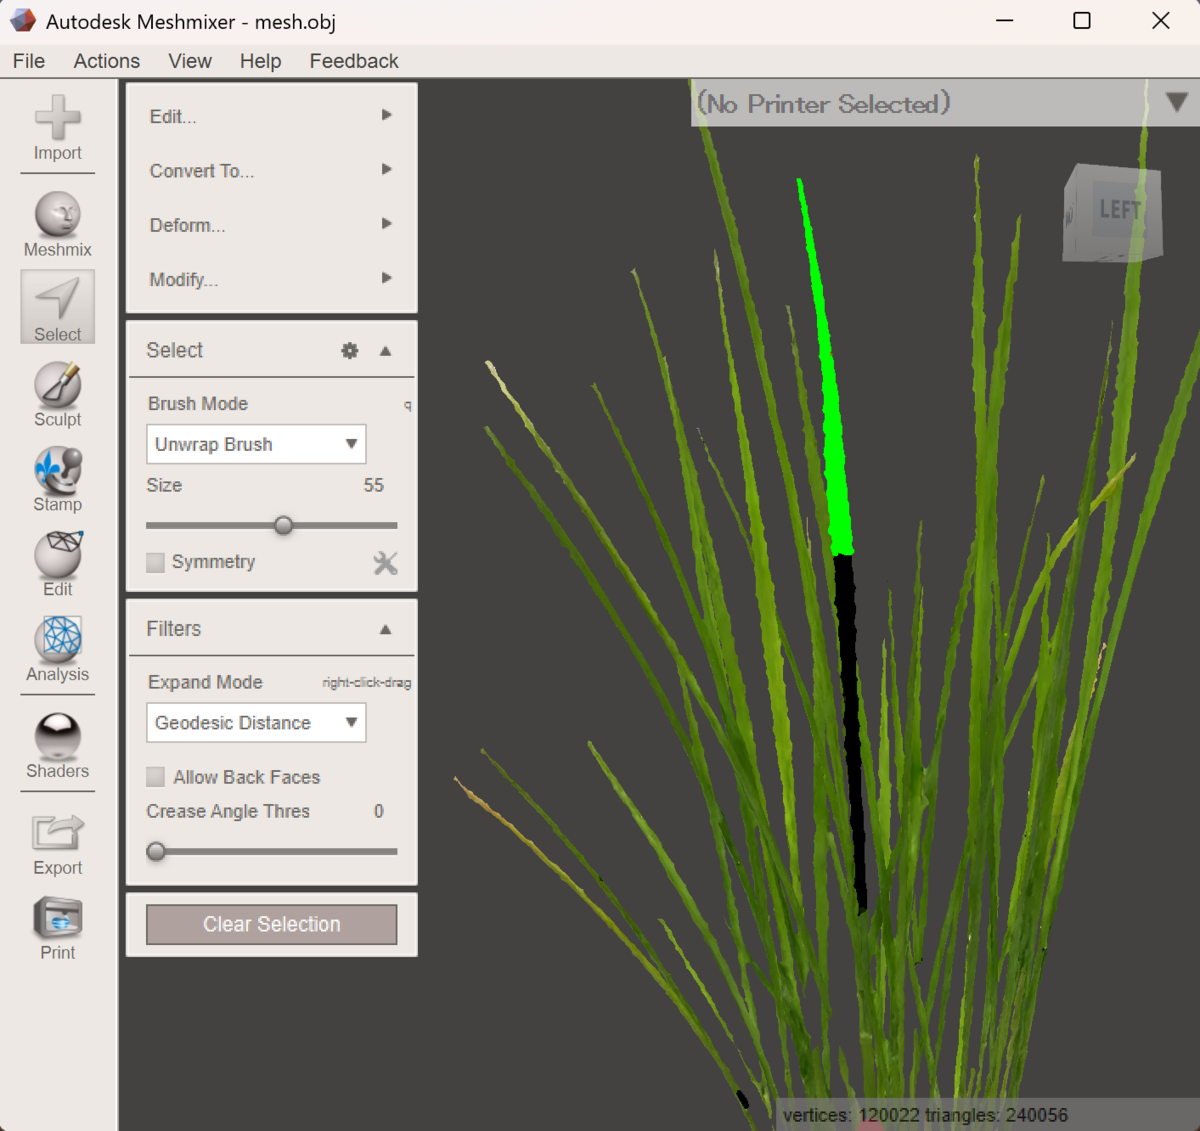
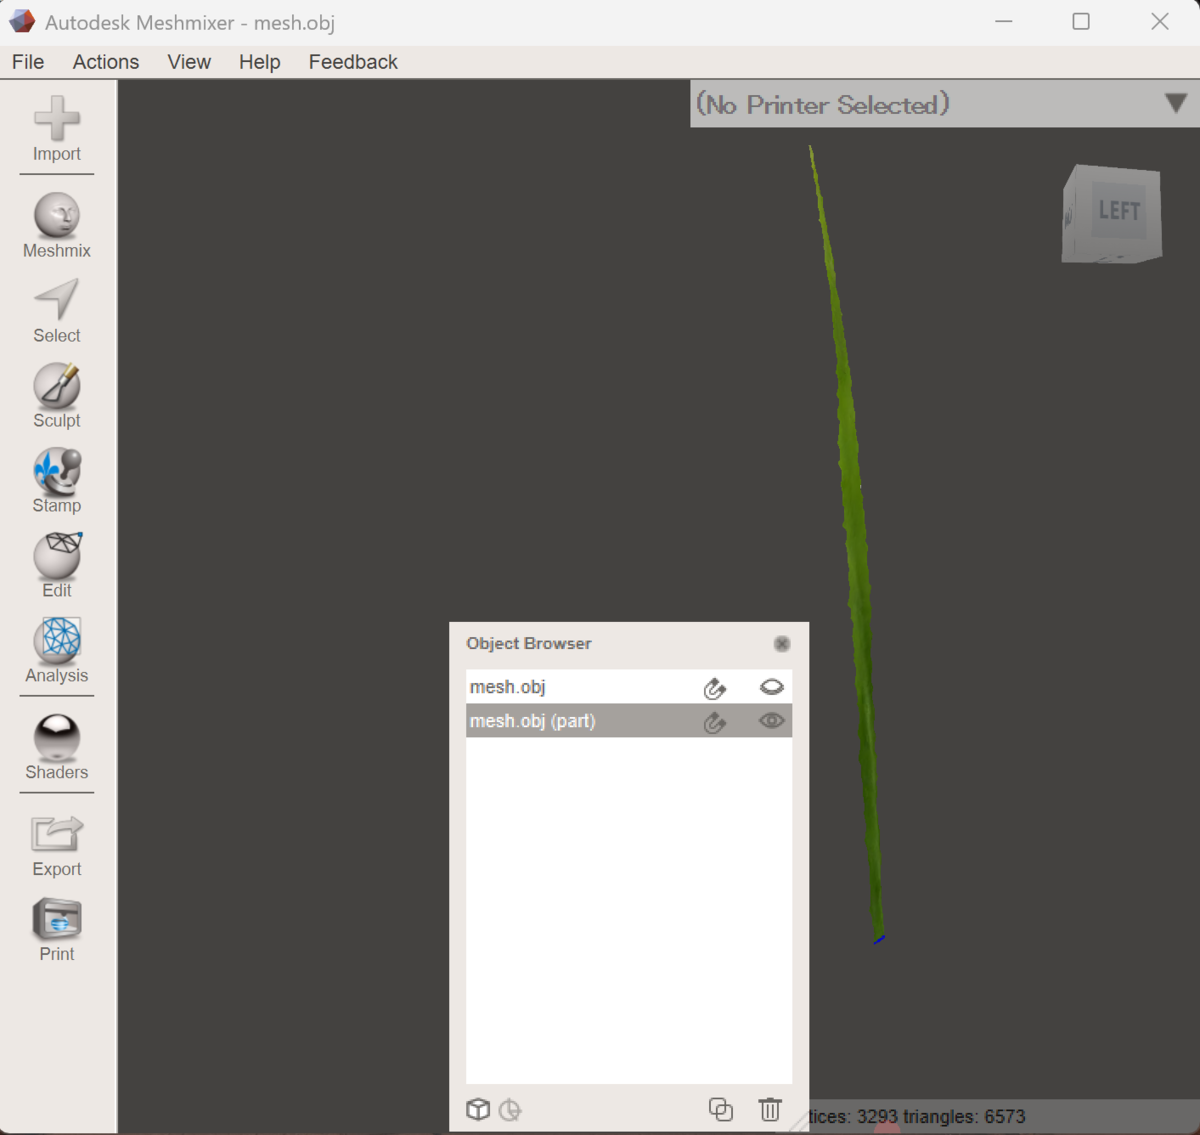
Sometimes you want to measure only a certain part, such as a stem or a leaf, rather than the whole plant. Open "Select," set "Brush Mode" to "Unwrap Brush," and adjust the brush "Size." Paint over the part you want by left-clicking, and the selected area turns black.
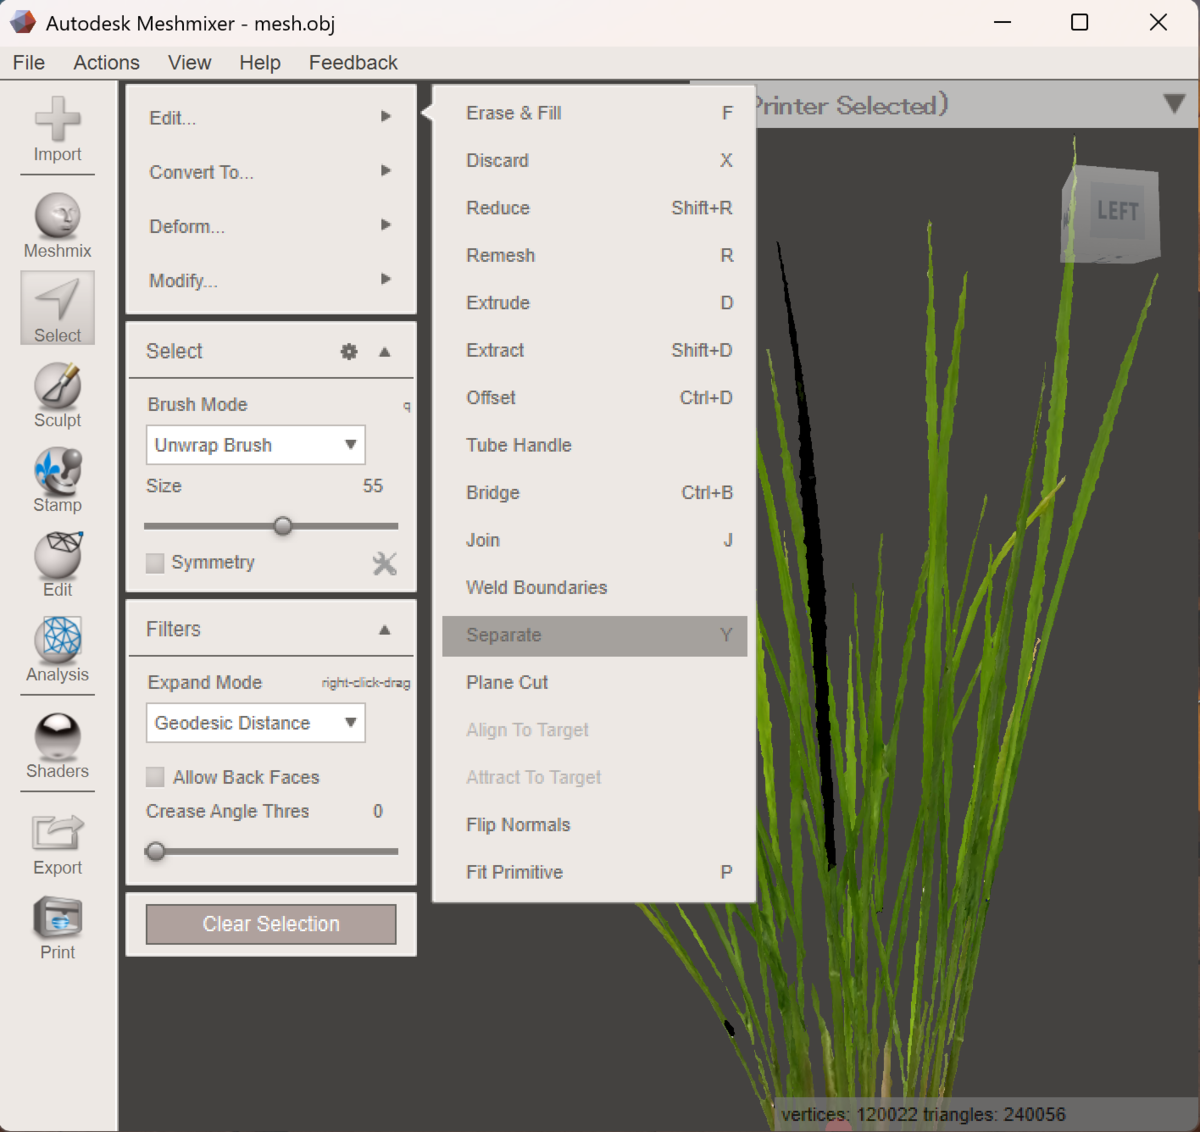
After separating, open "View → Show Objects Browser" to pick each part from the list. Then repair with Inspector and measure with Stability, part by part, just as before.
With just a phone video and free software, you can capture a plant's form as 3D data. Because it is non-destructive, the same plant can be measured again and again to follow how it changes over time. As long as you film carefully and set the scale with care, this is a method anyone can start with ease.